DTF transfers offer a modern solution for printing vibrant, durable designs on a wide range of fabrics. As the guide below explains, DTF printing, the DTF transfer process, and direct-to-film printing together deliver bold colors with a soft hand feel. For brands evaluating how to apply DTF transfers to garments, this approach combines high detail with efficient setup and flexibility. Compared with traditional methods like screen printing, DTF transfers can reduce lead times and broaden fabric compatibility, a key factor in the DTF vs screen printing comparison. Keep reading to learn practical tips for choosing films, powders, and presses to maximize color, durability, and wearability.
LSI-informed terminology often frames this method as film-based transfers or the direct-to-film technique, highlighting a film-first workflow. Other common descriptors include PET-film printing and heat-pressed, adhesive-backed transfers, which point to the same core process from different angles. In practice, the concept centers on applying a durable image to textiles via heat and pressure, enabling broad fabric compatibility and versatile design options. Using these synonyms helps designers compare DTF capabilities with alternatives like screen printing, ensuring you select the best fit for color, detail, and hand feel.
DTF Transfers: What They Are and How They Work
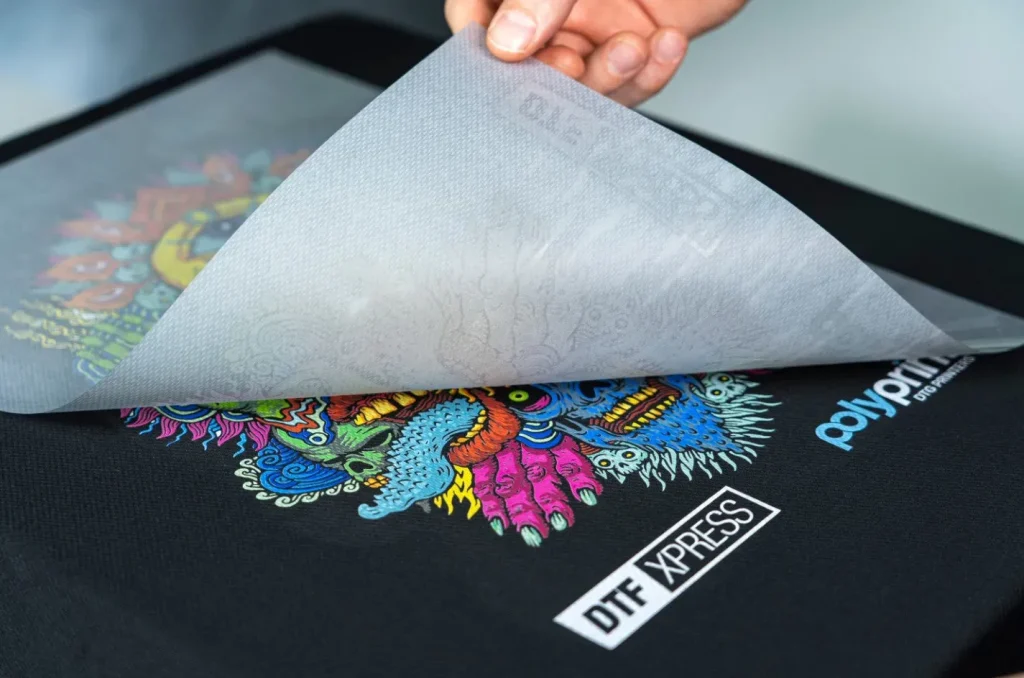
DTF transfers are heat-applied prints created by printing artwork onto a PET film using a DTF printer with white and color inks. After printing, a fine adhesive powder is applied and cured, and then the film is pressed onto fabric to transfer the design. When done well, DTF transfers deliver vibrant color, sharp detail, and a soft hand feel that compares favorably with other methods. This approach is driven by the DTF transfer process, which blends direct-to-film printing precision with heat-application convenience.
Compared with traditional screen printing, DTF transfers move the image from a film to the fabric via heat instead of applying inks directly to the material. This enables smaller runs, quicker setup, and easy design changes, making DTF transfers attractive for on-demand apparel and diversified product lines across cotton, blends, and select poly fabrics. For brands evaluating options, understanding how DTF printing differs from screen printing helps clarify expectations for color, feel, and durability.
The DTF Transfer Process: From Design to Garment
From design to garment, the DTF transfer process follows a clear path. Start with high-resolution artwork and prepare the file for PET film printing, planning for a white base, color separations, and proper bleed to maintain edge fidelity. A well-prepared file minimizes color shifts after transfer and helps maximize color accuracy during the DTF transfer process.
Printing on PET film with a DTF printer, applying adhesive powder, and curing creates a ready-to-transfer film. The subsequent steps include cooling, preparing the garment, and using a heat press to bond the image—this sequence embodies practical how-to steps for applying DTF transfers and is a core part of ensuring durable, vibrant results.
Direct-to-Film Printing: Materials, Ink, and Film Essentials
Direct-to-film printing relies on a PET film and multiple inks, including a white base for opacity on dark fabrics. The film carries the artwork in a precise sequence so the final print captures fine lines, gradients, and color-rich details typical of DTF printing. Understanding the hardware and media setup helps you optimize each color layer for sharpness.
Key supplies include the PET film, white ink, color inks, and an adhesive powder that cures to form the bond. Understanding how the film, ink chemistry, and curing temperature interact helps optimize color brightness, adhesion, and wash durability in DTF transfers, while selecting compatible film brands supports consistent results.
How to Apply DTF Transfers: Best Practices for Consistency and Quality
To apply DTF transfers with reliable results, begin with proper garment preparation: pre-press to remove moisture, position alignment marks, and ensure the surface is flat. Fabric choice and heat-press settings should align with the material specifications to prevent shifting during transfer. Knowing how to apply DTF transfers in practical terms helps standardize production.
During pressing, follow the recommended time, temperature, and pressure for your film and ink brand, then decide hot-peel or cold-peel based on the adhesive powder. After transfer, allow cooling and follow care guidelines to maximize adhesion, color retention, and overall durability, ensuring consistent outcomes across batches.
DTF Transfers Across Fabrics and Production Runs: When to Use Them
DTF transfers offer fabric compatibility beyond 100% cotton, including cotton blends and some poly blends, enabling diverse product lines without new screens. They’re particularly scalable for short to medium runs where setup cost and turnaround time matter most, and they enable straightforward comparisons between DTF vs screen printing in terms of cost, complexity, and flexibility.
Choosing DTF transfers benefits from testing different adhesives, inks, and film brands against your fabric choices. For large-volume production, run-length considerations and cost-per-unit matter, but for on-demand or custom designs, DTF transfers provide flexibility, easy design changes, and quick turnarounds.
Frequently Asked Questions
What are DTF transfers and how does the DTF transfer process work?
DTF transfers are heat-applied prints created by printing artwork onto a PET film using a DTF printer with white and color inks. After printing, an adhesive powder is applied and cured to bond the ink to the film. The film is then placed on a garment and bonded with heat and pressure, producing vibrant color, fine detail, and a soft hand feel. This overview explains the DTF transfer process and how it differs from other methods.
How to apply DTF transfers: what are the best practices for successful adhesion?
To apply DTF transfers correctly, start with clean, high-quality artwork and prepare the garment with a pre-press to remove moisture. Align the transfer on the fabric, cover with a protective sheet, and press at roughly 160-180°C (320-356°F) for about 12-15 seconds with steady pressure. Peel strategy matters: follow the film’s guidance to hot-peel or cold-peel after pressing. Allow the print to cure per manufacturer guidelines and follow care instructions to maximize durability.
DTF printing vs screen printing: when is DTF transfers the better option for your order?
DTF printing offers detailed full-color designs with good fabric compatibility and a soft hand feel, making it a strong choice for short to mid runs. Compared with screen printing, DTF transfers typically require lower setup costs and no screens, but can be more costly per unit at very high volumes. It suits fabrics like cotton, blends, and some poly blends, with excellent detail and color range. Choose DTF transfers when you need rapid setup, customization, or complex artwork.
Which fabrics are best suited for DTF transfers and what limitations should you consider?
DTF transfers work best on cotton, blends, and some poly fabrics, offering vibrant prints with a soft hand. Limitations include potential issues with very stretchy fabrics, long-term durability on certain materials, and ensuring proper curing of the adhesive powder. Always test on a sample fabric and follow care guidelines for wash-fastness.
What is direct-to-film printing in the context of DTF transfers, and what equipment is needed?
Direct-to-film printing refers to printing artwork onto PET film using a DTF printer, then applying adhesive powder and curing before transferring to fabric. Equipment typically includes a DTF printer, PET film, white and color inks, adhesive powder, a heat press, and appropriate heat settings. This setup enables reliable DTF transfers for on-demand printing and short runs. Always follow manufacturer guidelines for film and ink compatibility.
| Aspect | Key Points |
|---|---|
| What are DTF Transfers? | DTF transfers are heat-applied prints created by printing artwork onto a PET film using a DTF printer with white and color inks. An adhesive powder is applied and cured to bond the film to fabric, then heat and pressure transfer the image. When done well, DTF transfers deliver vibrant colors, fine details, and a soft hand feel comparable to DTG. |
| The DTF Transfer Process: Overview | Design and file prep: high-resolution design with color separations and white underbase planning. Printing on PET film with white base and color inks. Powder adhesive application and curing. Film preparation (cooling, peeling, and optional cold-press). Garment pre-press. Heat press transfer (temperature and time vary by film/fabric). Peeling and finishing (hot or cold peel). Curing and care after printing. |
| Key Benefits of DTF Transfers | Color vibrancy with full-color detail and smooth gradients; works on cotton, blends, and some poly fabrics; lower setup cost for small-to-moderate runs vs. screen printing; soft hand feel; facilitates quick design changes and on-demand customization. |
| DTF Printing vs Screen Printing: Key Considerations | Run length: DTF is often more economical for short to medium runs; screen printing shines for large-volume production after setup. Detail/color: DTF handles intricate designs and many colors; screen printing can be bold with fewer layers but needs more setup for complex artwork. Fabric compatibility: DTF suits a range of fabrics; some screen inks may have limitations on certain blends. Feel/durability: both are durable when done correctly, but DTF tends to feel lighter and softer. |
| Practical Application: How to Apply DTF Transfers | Design and prep: high-res artwork, plan white underbase for dark fabrics. Alignment and pre-press garment. Position and press with recommended heat/time/pressure. Peel strategy: hot-peel or cold-peel per film guidelines. Post-press care: cool before handling; follow wash-care instructions to maximize longevity. |
| Common Challenges & Troubleshooting | Color shifts or faded areas: check white underbase and color balance. Peeling/adhesion issues: verify adhesive curing and press temp/time. Cracking after washing: ensure proper curing and care; adjust fabric compatibility. Residue on fabric: clean platen and ensure film/powder cleanliness. |
| Maintenance, Longevity, and Care | Regularly clean heat press/platens; store films and powders in a cool, dry place; provide customers with clear care instructions (wash inside out, mild detergents, avoid high heat). Update designs to keep offerings fresh while maintaining production quality. |
Summary
Conclusion: DTF transfers summarize a versatile, efficient path for modern apparel printing, offering vibrant color, broad fabric compatibility, and quick setup. By understanding the DTF transfer process, selecting reliable films and inks, and following best practices for design, adhesion, and care, brands can produce durable, high-quality garments with diverse artwork. DTF transfers enable small-batch and on-demand runs without extensive screen setup, while still delivering professional results across a range of fabrics and applications.