DTF Transfers have transformed fabric printing, offering vibrant, durable designs with a friendly learning curve for beginners. If you’re exploring Direct-to-Film printing for the first time, you’re in the right place. This beginner’s guide covers the essential materials—the DTF transfer film and related supplies—and maps a straightforward workflow for apparel. With a proper setup, you can produce bold, full-color designs on cotton, blends, and many fabrics. Following best practices helps you avoid common missteps that waste time and materials.
Viewed through an alternative lens, the technique is a film-based heat-transfer method where art is printed onto a carrier sheet, prepped with a bonding powder, and then pressed into fabric. Common terms for this approach include film-to-fabric transfers, digital-to-textile printing, and a DIY-friendly workflow that emphasizes on-demand color and versatility. In practical terms, this method uses a bonded film or paper to carry the artwork, which is later activated with heat and pressure to achieve a soft hand and durable finish. Because it works across a range of fabrics, hobbyists and small shops often choose it for short runs of customizable apparel. If you’re just getting started, focusing on precise pre-press, accurate curing, and careful temperature and timing will smooth the learning curve. This can be referred to as a printable film-to-garment process by some suppliers. This approach is often called a printable film-to-garment process or a bond-on-fabric transfer, depending on the supplier and the equipment. A successful implementation hinges on calibration, correct heat, and durable bond forming under pressure. In the end, the technique delivers crisp images with a soft hand and lasting performance across a broad range of garments. For aspiring makers, the emphasis is on ease of use, affordability, and flexibility that suits small runs and personalized projects.
DTF Transfers Essentials: Understanding Direct-to-Film Printing for Beginners
Direct-to-Film transfers expand the capabilities of garment decorating by letting you print vibrant designs on a specialty film using DTF inks, then transfer them with heat to a wide range of fabrics. For beginners, DTF transfers offer a gentler learning curve compared to traditional screen printing, while delivering full-color artwork with a soft hand feel.
Understanding why this method matters begins with the workflow: print on film using DTF ink and film, apply a bonding powder, cure, and finally press onto the garment. The combination of a straightforward process and compatibility with cotton, polyester blends, and more makes DTF transfers a practical entry point for DIY apparel printing with DTF.
Choosing Materials for DTF: From DTF Ink and Film to DTF Transfer Paper
Selecting the right materials starts with a compatible printer that can handle DTF ink and film, plus DTF transfer paper when needed. Pair trusted DTF ink with the matching film and powder; a cohesive kit improves color accuracy and reduces misprints.
Consider the curing device and heat press as part of your material stack. The quality of your DTF transfers hinges on matching the ink, film, and powder in a way that suits your fabrics and workshop conditions. For DIY apparel printing with DTF, sticking to proven combinations helps you avoid costly trial-and-error.
DIY Apparel Printing with DTF: A Beginner-Friendly Workflow and Tips
DIY apparel printing with DTF starts with artwork prepared for film transfer: design in layers, separate white underlay for dark fabrics, and export at suitable DPI. This Direct-to-Film printing workflow is adaptable for a home studio, keeping steps clear and repeatable.
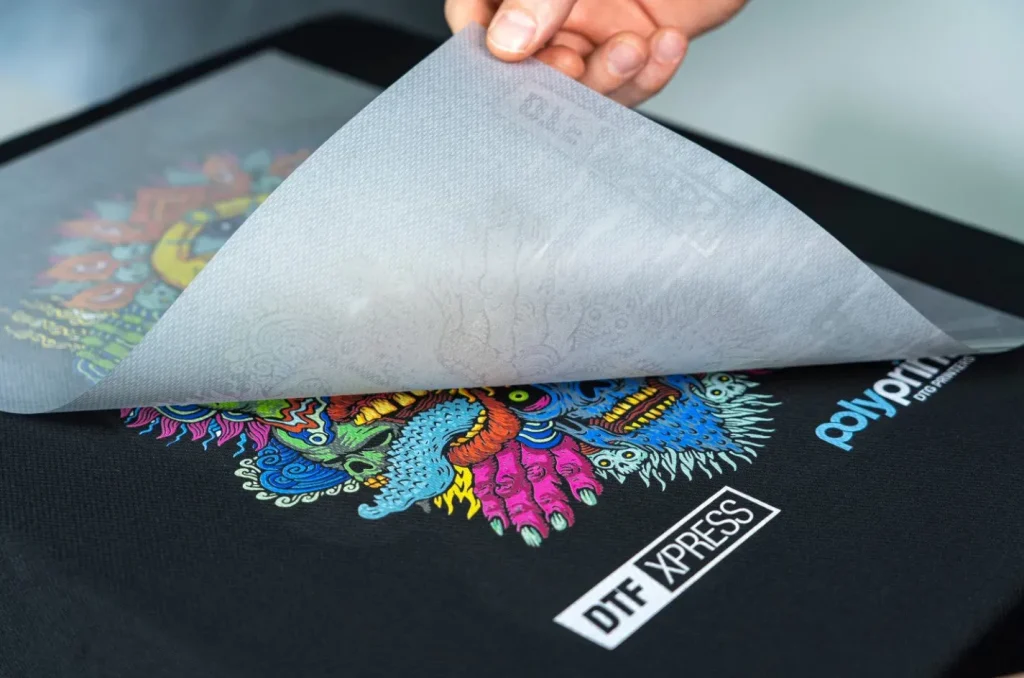
Next, print on DTF film using your chosen settings, apply adhesive powder, cure, and then transfer with a heat press. With the right steps, you’ll achieve bold, durable graphics on a range of fabrics, making this a practical path for DIY apparel printing with DTF.
Troubleshooting and Quality Control in DTF Transfers
Common issues in DTF transfers include dull colors, cracking, or halos near edges. Start by verifying your curing process, ensuring even heat and adequate time, and confirming that the powder is evenly distributed.
Additionally check film alignment and moisture levels before transfer, and refine your heat-press settings for full contact. Regularly run test prints on similar fabrics to fine-tune color management and improve consistency.
Durability, Care, and ROI: Making DTF Printing Work for Beginners
Durability and care are critical for turning DTF transfers into long-lasting apparel. After curing, wash garments inside-out on cold cycles and avoid high-heat dryers for several washes to preserve vibrancy.
To optimize ROI and production efficiency, use batch print workflows, document your settings, and build a library of designs that perform well across fabrics. This approach supports scalable Direct-to-Film printing for beginners pursuing small runs and custom orders.
Frequently Asked Questions
What are DTF transfers and why are they popular for beginners in Direct-to-Film printing?
DTF transfers are designs printed onto a specialized film using DTF inks, then bonded to fabrics with a curing powder and heat press. In Direct-to-Film printing, the printed film carries the design and is transferred to the garment, delivering vibrant color on many fabrics with a soft hand-feel. This approach is popular with beginners because it simplifies color management, supports dark and light fabrics, and offers a straightforward workflow from design to finished garment.
What materials do I need to start with DTF transfer paper and DTF ink and film for DIY apparel printing?
To get started, you’ll need a compatible printer that can handle DTF inks, DTF ink and film, DTF transfer paper (film), a bonding powder, a heat press, and a curing setup. Choose reliable, compatible components from trusted brands to ensure the ink, film, and powder work well together. A tidy workspace and some test prints will help you dial in settings before full runs.
What is a practical beginner workflow for DIY apparel printing with DTF?
A practical beginner workflow for DIY apparel printing with DTF includes design and pre-press, printing on DTF film, applying adhesive powder, curing, garment preparation, transferring, peeling, and post-care. Use designs at 300–360 DPI for crisp edges, consider a white underlay for dark fabrics, and follow recommended heat-press temps and times (for example around 305–320°F for 10–20 seconds) with steady pressure. After transfer, peel the film and allow the garment to cure before washing.
What are common issues in DTF printing for beginners and how can I troubleshoot them?
Common issues include faded or dull colors, cracking or peeling, white halos, and sticking to the backing. Troubleshoot by checking ink quality, ensuring even powder distribution, and confirming thorough curing. Re-check heat and pressure during transfer, verify film alignment, and ensure the surface is dry; running a few test prints on similar fabrics can help dial in settings.
How does DTF transfers compare to DTG and screen printing for beginners, and what about ROI and practical tips for DIY apparel printing with DTF?
DTF transfers offer a flexible middle ground: strong color reproduction, broad fabric compatibility (including dark garments), and lower upfront costs for small runs. For DIY apparel printing with DTF, the workflow is generally simpler and scalable from hobby to small business, making it a compelling option when you want quick turnarounds and reliable results. ROI improves with batch processing, popular designs, and careful material selection (DTF ink and film, transfer powder) to maximize efficiency.
| Topic | Key Points |
|---|---|
| What are DTF Transfers and why they matter for beginners | Direct-to-Film (DTF) transfers involve printing designs onto a specialized film using DTF inks, applying bonding powder, curing, and transferring the design to fabric with heat and pressure. This yields vibrant, durable graphics across many fabrics and offers easier color management and broader fabric compatibility for beginners. |
| Essential materials you need | Printer capable of handling DTF inks; DTF ink; DTF transfer film; bonding powder; heat press; curing system; reliable setup with compatible components. |
| Practical workflow (design to garment) | Design and pre-press: plan artwork; Print on DTF film; Apply adhesive powder; Cure the film; Prepare garment; Transfer with heat and pressure; Peel carrier; Post-process care. |
| Choosing fabrics and understanding limits | DTF works on 100% cotton, cotton blends, and many poly blends; adjust pressure/time for lighter or delicate fabrics; white underlay helps colors on dark fabrics; vibrant results are common on light fabrics. |
| Troubleshooting common issues | Faded colors: check ink and even powder application; ensure thorough curing. Cracking/peeling: verify heat, time, and pressure. White halos: re-check alignment and dryness. Sticking to white backing: ensure correct release sheet and consider a light re-press. |
| Care and durability | Durability comes with proper curing and post-press care. Wash inside-out in cold water; avoid high-heat drying early on. With good care, DTF transfers withstand many washes and maintain a soft hand-feel. |
| DTF transfers in context: direct-to-Film vs other methods | Compared to DTG and screen printing, DTF offers strong color reproduction, broad fabric compatibility (including dark garments), easier setup for small runs, and scalable production—making it a versatile option for DIY enthusiasts and small businesses. |
Summary
DTF Transfers open a practical entry point into Direct-to-Film printing for beginners, offering vibrant graphics, a straightforward workflow, and broad fabric compatibility. By understanding the core concepts, selecting reliable materials like DTF ink and film with bonding powder, and following a clear printing and curing process, you can start producing professional-looking designs for apparel with confidence. Practice, test, and iterate your designs and settings. With time, DTF transfers become faster, more consistent, and empower you to turn ideas into wearable art across a range of garments.