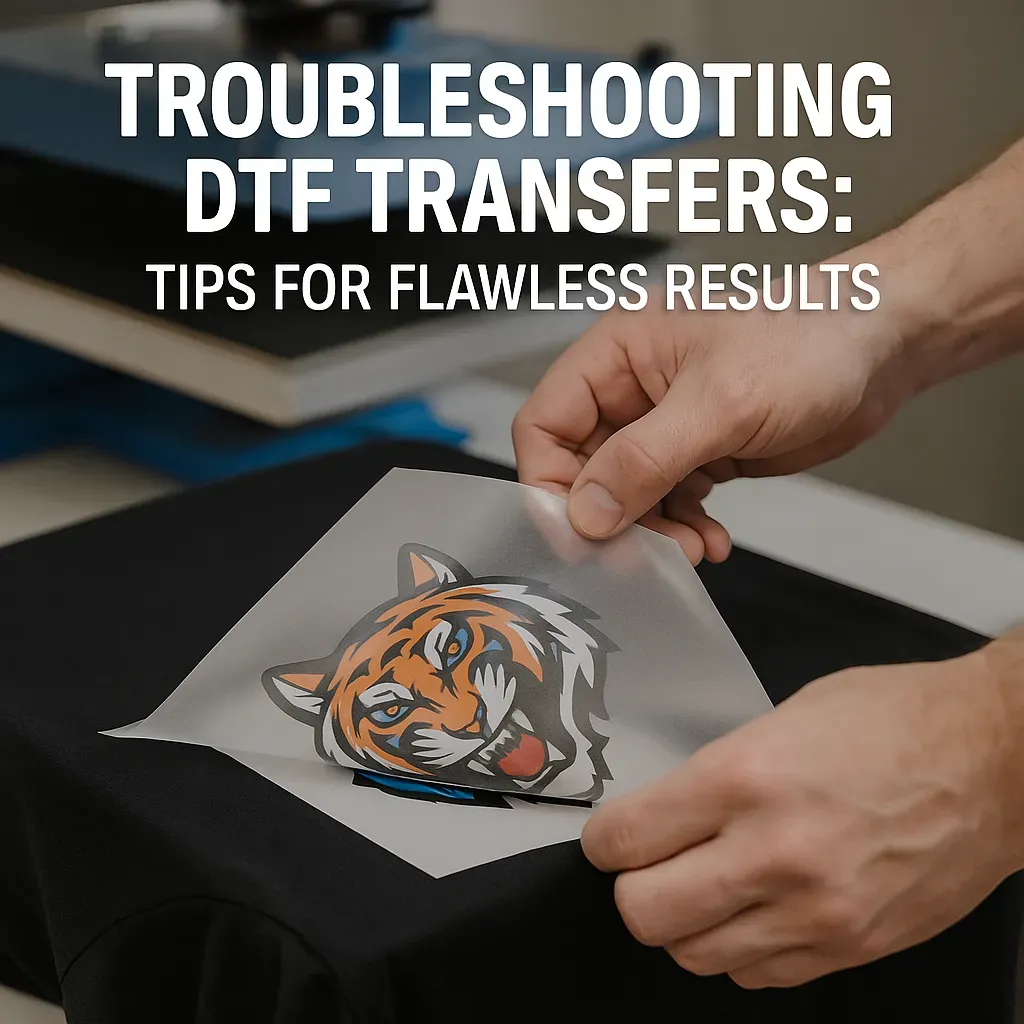
DTF transfers troubleshooting is more than a quick fix; it’s a disciplined approach to diagnosing and solving the problems that derail your print projects. By addressing common DTF transfer issues with a systematic workflow, you can improve DTF printing troubleshooting and move from guesswork to repeatable results. Understanding how DTF heat press settings and ink adhesion problems interact with film, powder, and fabric helps protect transfer quality results. The approach emphasizes a repeatable production sequence—pre-press, print, powder, cure, and press—to minimize variability across jobs and fabrics. With consistent materials, calibrated equipment, and careful documentation, you can build confidence in your DTF workflow and achieve vibrant, durable transfers.
From a different angle, this discipline can be described as Direct-to-Film print quality optimization, focusing on adhesion reliability, color fidelity, and edge clarity to ensure long-lasting results. Rather than chasing a single setting, teams explore practical workflows that address substrate compatibility, print calibration, pre-press habits, and curing timing. In LSIs terms, the emphasis shifts to understanding transfer consistency, material interactions, and process control—the variables that shape outcomes on cotton, blends, and synthetics. This perspective aligns with best practices for heat transfer applications, where ink and powder behavior, press temperature, dwell time, and fabric fiber content steer results. Adopting a data-driven approach—documenting test results, tracking materials, and standardizing routines—helps studios deliver reliable, repeatable DTF outcomes.
DTF Transfers Troubleshooting: A Structured Path to Consistent Results
DTF transfers troubleshooting is more than chasing a single setting; it’s a method of diagnosing adhesion, color, and edge issues across the entire workflow. By framing the process around common DTF transfer issues, you can identify where problems originate—from pre-press alignment to curing and pressing—and build a repeatable system that yields steady results. This approach also supports broader goals of improved DTF printing troubleshooting by mapping each step to the fabric and design being produced.
A structured method reduces variability and leads to better DTF transfer quality results. By focusing on root causes—such as ink adhesion problems on specific fabrics or film misalignment—you create a repeatable workflow that addresses adhesion, color accuracy, and durability. Documenting observations helps you refine pre-press, printing, powdering, curing, and pressing procedures, so each new job benefits from proven decisions and fewer surprises.
Calibrating Your Equipment for Consistent DTF Transfer Quality Results
Quality starts with precise calibration. Regular printer alignment, nozzle checks, and ICC profiling tailored to the fabric type help prevent DTF transfer issues before they appear on garments. Consistent calibration also supports reliable color reproduction, reducing drift across runs and helping operators trust the printed results.
Maintain a log of calibration steps, test charts, and color checks to support ongoing DTF printing troubleshooting and track improvements in DTF transfer quality results across batches. Align RIP settings and ICC profiles for each target fabric to minimize color shifts and preserve smooth gradients, ensuring reliable outcomes from first to last copy.
Optimizing Heat Press Settings for Durable DTF Transfers
Heat press settings are a critical control point for adhesion and edge integrity. By testing combinations of temperature, dwell time, and pressure, you can tune DTF heat press settings to suit each fabric and design, laying a solid foundation for durable transfers.
Careful balancing of heat and time reduces ink flake, improves transfer quality results, and minimizes DTF coating cracking. Use protective sheets and verify platen contact, then calibrate pressing force to prevent distortion and ensure clean edges that hold up through washing and wear.
Color Management and Ink Compatibility to Prevent DTF Ink Adhesion Problems
Color fidelity hinges on compatible inks, powders, and films, plus correct ICC profiles. DTF transfer issues often manifest as color shifts or muddy tones when the ink and powder chemistry isn’t harmonized, so establishing a color-ready workflow is essential.
Develop a color management routine by validating a test print on each fabric, using neutral references, and monitoring ink adhesion on release sheets. When the right inks align with the film and cure process, you reduce DTF ink adhesion problems and improve overall transfer durability and color consistency across jobs.
Fabric Selection and Design Strategy for Reliable DTF Transfer Outcomes
Fabric type anchors the entire workflow; fiber content, weave, and finishing affect adhesion, wash durability, and image sharpness. By grouping fabrics by behavior—cotton tees, blends, or synthetics—you can tailor pre-press, powder, and heat step settings for more predictable results and reduced risk of DTF transfer issues.
Design strategy matters just as much as material choice. Select artwork with appropriate contrast, halftone values, and line weights for the chosen fabric to maintain legibility after transfer and washing. This disciplined approach helps prevent halos, edge cracking, and other common DTF transfer issues, supporting repeatable, high-quality outcomes across multiple runs.
Frequently Asked Questions
What is DTF transfers troubleshooting, and how can I systematically address common DTF transfer issues?
DTF transfers troubleshooting is a disciplined approach to diagnosing and solving problems that affect adhesion, color, and durability. In practice, address common DTF transfer issues such as poor adhesion, edge cracking, color bleed, halos, and blurring with a repeatable workflow: pre-press checks, printer calibration with fabric-specific ICC profiles, consistent powder application, proper curing, and precise pressing. Use test swatches, document settings, and adjust by fabric type to build reliable results.
How can I optimize DTF heat press settings to improve DTF transfer quality results?
DTF heat press settings are fabric-dependent. Start with a baseline such as 160–170°C (320–338°F) for 10–20 seconds with even pressure, then allow a controlled cool-down. Ensure the platen is clean and flat, use a protective sheet, and avoid overheating. If you notice edge distortion or poor adhesion, slightly extend time, adjust pressure, and re-test on a swatch to achieve consistent transfer quality results.
What are the common causes of DTF ink adhesion problems, and how can I fix them in DTF printing troubleshooting?
DTF ink adhesion problems can stem from insufficient pre-press moisture removal, incompatible powder or film, and improper curing. Fixes include pre-pressing the fabric for 5–10 seconds to remove moisture, applying powder evenly and ensuring it cures, confirming ink–film compatibility, and calibrating the printer with the correct color management. Always validate with a test print on a representative fabric.
Why do color bleed and halos occur during DTF transfers, and how can I prevent them through color management in DTF printing troubleshooting?
Color bleed and halos often result from printer calibration or profile mismatches. Use a calibrated printer with ICC profiles tailored to the target fabric, run color-accurate test charts, and verify RIP settings for resolution, color management, and halftone patterns. Maintain clean transfers and control environmental factors like humidity to prevent ink drift and halo formation.
What quick checks should I perform to verify DTF transfer quality results before a full production run?
Use a practical checklist: confirm fabric type and pre-press conditions, print a test swatch to check color and edge integrity, calibrate the printer with appropriate ICC profiles, verify film and powder compatibility, ensure powder is evenly applied and properly cured, and test pressing parameters (temperature, time, and pressure). Document outcomes to improve future DTF transfer quality results.
| Aspect | Key Points | Notes / Fixes |
|---|---|---|
| Focus of DTF transfers troubleshooting | DTF transfers troubleshooting isn’t about chasing a single magic setting; it’s a systematic, repeatable process. | Involves diagnosing print quality, adhesion, color accuracy, and durability; align pre-press, printing, powdering, curing, and pressing with fabric type and design to reduce errors and improve results. |
| Poor adhesion | Root causes: insufficient pre-press, incorrect heat-press settings, wrong powder viscosity. | Fixes: pre-press 5–10 seconds, heat at ~160–170°C (320–338°F) for 10–20 seconds with controlled cool-down; powder evenly; confirm fabric type and fiber content; ensure curing is adequate. |
| Cracking / edge flaking after washing | Causes include insufficient curing, over-washing, or heat transfer issues at design edges. | Fixes: increase pressing time, ensure even pressure across design, clean platen, use protective sheet, longer curing or lower temperature depending on fabric/ink compatibility. |
| Color bleed / color mismatch | Often due to printer calibration, ink/powder quality, or post-processing; RIP ICC profiles can affect color. | Fixes: calibrate printer, verify color profiles, test with chart; ensure ink/powder compatibility with film; validate RIP settings; keep transfer clean and moisture-free before processing. |
| White edges / halos | Haloes typically from film-garment misalignment or residue on transfer surface. | Fixes: align transfer precisely (registration marks), test alignment; ensure clean surface; uniform powder layer; avoid over-wetting or over-fusing edges; adjust pressing time. |
| Blurred / fuzzy image or loss of detail | Often from low-resolution designs, excessive heat, or long contact timing. | Fixes: use high-resolution artwork; verify DPI for print size; reduce press time for detail-heavy designs; ensure proper alignment and avoid stretching during curing. |
| Practical troubleshooting checklist | A repeatable workflow across steps. | – Pre-press checks: confirm fabric type, pre-press 5–10s, test print for color/alignment; – Printing workflow: calibrated printer with ICC profiles; test film-powder-ink compatibility; inspect color/gradients before powdering; – Powdering and curing: apply powder evenly, bake/cure per supplier guidance, cool slightly; – Pressing and post-press: even pressure, clean platen, correct temperature/duration, follow peel guidance; – Quality control: small test batches when changing materials/settings; document results and maintain environment notes. |
| Best practices for achieving quality results | Best practices to minimize problems from the start. | – Standardize materials (film, powder, inks); keep lot logs for traceability. – Regular calibration and maintenance of printer and heat press. – Master color management with target ICC profiles and periodic checks. – Fabric-aware design choices and appropriate halftone/contrast. – Maintain a troubleshooting knowledge base for issues and fixes. |
| Real-world scenarios: case studies | Examples illustrate iterative improvements in adhesion, color accuracy, and edge crispness. | Case summaries: Case 1 improved edge bonding by adjusting pre-press and curing; Case 2 mitigated color bleed via ICC profiles and shorter pressing; Case 3 sharpened lines by RIP adjustments and alignment checks. |
| Key takeaways for effective DTF transfers troubleshooting | Structured approach, fabric-aware decisions, and data-driven iteration. | – Start with pre-press, then print, powder, cure, and press in sequence with small documented changes. – Use consistent materials and environments to reduce variability. – Calibrate and manage color accurately with ICC profiles and regular checks. – Maintain a living knowledge base of issues and fixes. |
Summary
HTML table explaining key points of the base content in English.