DTF transfers on dark fabrics revolutionize how designers achieve vibrant, long-lasting prints on dark garments, and this guide explains how DTF works on dark fabrics to deliver bright results. When aiming for opaqueness, you’ll want to leverage techniques that ensure bright colors DTF stay vivid on black surfaces. This article covers practical steps, including choosing the right materials, curing, and post-transfer care to achieve DTF transfer opaque colors. You’ll also find dark fabric printing tips to maximize opacity and durability through multiple wash cycles. And for decision-making, a comparison of DTF vs HTV on dark fabrics helps designers choose the best method for multi-color designs on charcoal and black fabrics.
In alternative terms, this approach is often described as direct-to-film printing on dark textiles, or film-based transfers that require a strategic white underbase. From an LSI perspective, related phrases such as opaque color printing, dark fabric handling, and comparisons like DTF vs HTV on dark fabrics help align content with diverse search queries. Understanding these linked terms can guide setup decisions and improve how readers discover practical guidance for bright, durable results on dark garments.
DTF Transfers on Dark Fabrics: Achieving Bright, Opaque Colors
Dark fabrics present a unique color challenge because the textile’s base tone can mute or shift printed colors. In practice, how DTF works on dark fabrics hinges on building brightness and opacity into the transfer so that reds, blues, and yellows read clearly against a black, navy, or charcoal background. The white underbase acts as a bright canvas, allowing the full color spectrum to pop once transferred. This principle is the core of achieving vivid, opaque colors on dark substrates, and it guides every step from design to curing.
To get true opacity, plan for an opaque white backing on the film or enable a solid white layer in your workflow. The goal is to deliver DTF transfer opaque colors that remain vibrant after washing. When you compare DTF transfers on dark fabrics with other methods, you’ll notice that the white underbase typically provides more consistent opacity across a wider range of dark fabrics, assuming proper curing and film quality are used.
Setting Up for Success: Right Equipment for Bright DTF on Dark Fabrics
A reliable setup for bright results on dark fabrics starts with a printer capable of white ink or a dedicated white underbase workflow, plus a transfer film and adhesive powder designed for DTF. The right combination ensures even powder distribution and minimizes mottling, which is essential for keeping colors vivid on black or navy garments. This is also where the choice between DTF and HTV on dark fabrics comes into play; DTF often yields more uniform opacity across multi-color designs.
Equally important are the heat-press parameters and care guidelines tailored to fabric type and ink chemistry. Temperature, time, and pressure must be calibrated to activate the adhesive and set the color without scorching the fabric. Following dark fabric printing tips for press settings and post-transfer care helps preserve brightness and prevents distortion of the underbase and color layers.
Color Management and Underbase Techniques for Opacity
Effective color management starts with your design process. Aim for high saturation and plan your palette with a solid white underbase in mind. Techniques that emphasize bright colors DTF and opaque color buildup ensure the final image reads strongly on dark backgrounds. By profiling your workflow to maximize opacity, you translate screen visuals into bold, durable prints that stand up to washing.
Color profiling and calibration are critical to consistent results. Build profiles that prioritize saturation and opacity, and test on representative fabrics before committing to a full run. Considering finishes (gloss vs. matte) can also influence perceived brightness, so choose a finish that complements your color choices and the garment’s texture while maintaining opacity over time.
A Step-by-Step Workflow to Maximize Opacity on Dark Fabrics
Design and color management: Start with a high-resolution file (at least 300 dpi) and plan for an adequate white underbase. If your printer supports white ink, enable a solid white foundation; if not, ensure the transfer film backing provides this opacity. This approach aligns with the idea of achieving bright colors DTF and opaque colors right from the design stage.
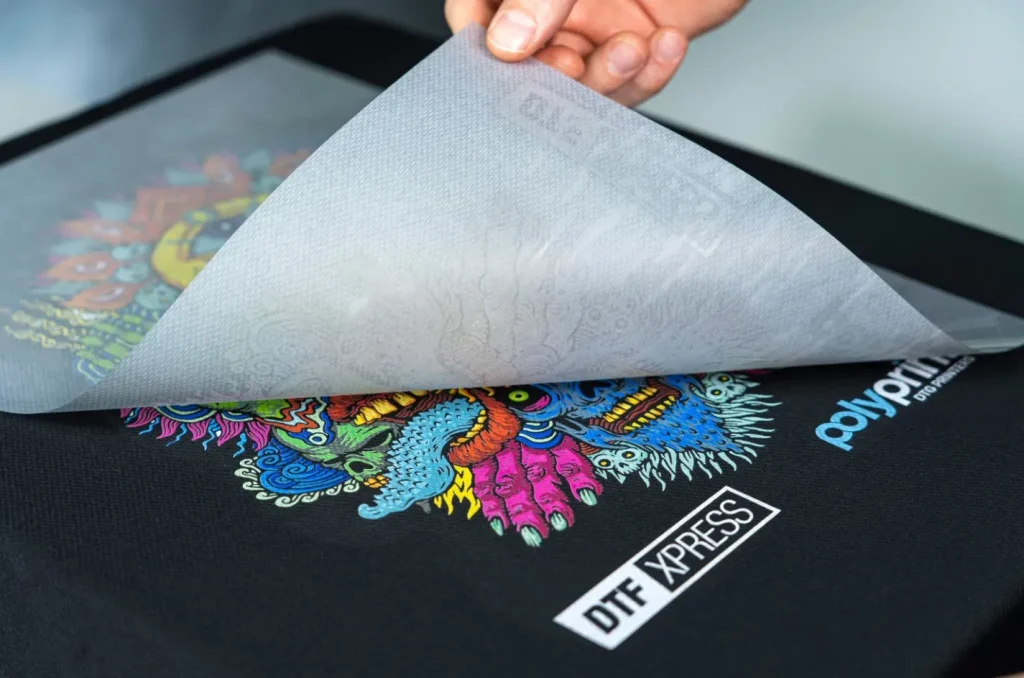
Material preparation and printing: Pre-wash and prep the garment, align it precisely, and print the white underbase (if applicable) before the color layers. Powdering, curing, and transfer parameters follow—dust evenly, cure thoroughly, and apply heat with the right duration and pressure. Finish with a peel method (hot or cold) that preserves edge sharpness and opacity, then cure post-transfer to lock in durability.
Troubleshooting, Durability, and Real-World Scenarios
Common issues include dull colors, insufficient opacity, or color bleed on edges. Solutions center on white underbase coverage, curing accuracy, and powder adhesion. If you see reduced brightness on dark fabrics, re-evaluate the underbase strength and printer profile for higher opacity, ensuring the transfer film is properly cured and the powder is evenly distributed. These adjustments mirror practical dark fabric printing tips used in real-world runs.
Durability considerations cover wash care and long-term color stability. Post-wash testing helps you gauge opacity retention and adhesion; if fading occurs, revisit curing time, heat, and powder formulation. Real-world applications—single-batch prints, team apparel, and promotional items—benefit from a robust DTF workflow that emphasizes opacity and color integrity on dark fabrics, while also weighing DTF vs HTV on dark fabrics for different design complexities and production volumes.
Frequently Asked Questions
DTF transfers on dark fabrics: how does the process ensure bright colors?
DTF transfers on dark fabrics achieve bright colors by using a white underbase or an opaque backing on the transfer film. This white layer acts as a bright canvas beneath the color layers, so vivid hues don’t get filtered by the fabric. Key steps include designing with adequate white space, printing a solid white layer (if your workflow supports it), applying uniform adhesive powder, curing properly, and transferring at the correct temperature and time. Proper white underbase and color management are essential for true brightness when comparing DTF transfers on dark fabrics to other methods.
How does DTF transfer opaque colors on dark fabrics work, and how can I maximize opacity?
To achieve DTF transfer opaque colors on dark fabrics, ensure a strong white underbase or backing on the transfer film. Use a printer or workflow capable of laying down solid white, followed by saturated color layers. Calibrate printer profiles for maximum brightness, use high-quality transfer film and evenly distributed adhesive powder, and cure accurately. During transfer, optimize heat and pressure (typical ranges around 310–330°F for 12–18 seconds) and allow proper post-transfer curing. These practices help maximize opacity so colors read clearly on dark backgrounds.
Dark fabric printing tips for DTF transfers on dark fabrics?
Follow these dark fabric printing tips for DTF transfers on dark fabrics: pre-wash garments to remove sizing, press to remove wrinkles, and align carefully for precise placement. Use a smooth, dry fabric surface and ensure consistent powder application. Design with an effective white underbase, print a solid white layer if possible, and cure thoroughly. When transferring, use appropriate heat and pressure for the fabric type, and perform a hot or cold peel according to your system. Good prep, curing, and alignment materially improve opacity and edge sharpness on dark fabrics.
DTF vs HTV on dark fabrics: which yields better opacity and why?
DTF vs HTV on dark fabrics: DTF generally offers better opacity and color vibrancy for multi-color designs on dark textiles due to the white underbase built into the transfer process. DTF can provide more consistent opacity across different dark fabrics and higher throughput for complex designs, whereas HTV is often effective for solid colors but may require more layers or different vinyls to achieve comparable opacity. For bulk production and intricate artwork on dark fabrics, DTF is typically the more efficient choice.
What is the role of the white underbase in DTF transfers on dark fabrics?
The white underbase is critical in DTF transfers on dark fabrics. It serves as the bright canvas that allows colors to appear vivid once transferred, ensuring opacity and pop on dark backgrounds. Depending on the system, this white can be printed as a dedicated underbase or achieved through an opaque backing on the film. Without a strong white underbase, colors can look dull or translucent on black, navy, or other dark fabrics. Building the white layer correctly is foundational to successful DTF transfers on dark fabrics.
| Topic | Key Points |
|---|---|
| Introduction | DTF transfers on dark fabrics enable vibrant, long-lasting prints on dark garments. The goal is bright, opaque colors that pop against dark backgrounds while remaining durable through wash cycles. The guide covers how DTF on dark fabrics works, steps to maximize opacity, and troubleshooting tips. |
| Understanding the Challenge | Dark fabrics can mute colors; achieving brightness and opacity requires an effective white underbase or opacity strategy to ensure colors read clearly on dark substrates. |
| What DTF Is and Why It Excels on Dark Fabrics | DTF prints a full-color image on film, then uses adhesive powder and heat to transfer. A white underbase on or under the film provides a bright canvas, giving predictable opacity across many fabrics, including dark cotton blends and some polyesters. |
| Choosing the Right Setup | Use a printer capable of white ink or white underbase; quality transfer film and adhesive powder; proper heat-press parameters; post-transfer care to preserve opacity and color fastness. |
| Step-by-Step Guide to Achieving Bright, Opaque Colors | 1) Design at high resolution with adequate white underbase. 2) Prepare garment surface. 3) Print transfer film with white underbase if applicable. 4) Powder and cure. 5) Transfer with correct time/temperature/pressure. 6) Peel method and post-press. 7) Cure and wash care. |
| Troubleshooting Common Issues | Dull colors: check white underbase; not enough opacity: add thicker white layer; bleeding/edge feathering: adjust heat/time; cracking on stretch fabrics: adjust tension and ink flexibility. |
| Advanced Tips for Durability and Color Management | Substrate matters; color profiling; finishes; post-wash testing; DTF vs HTV on dark fabrics: DTF often offers better opacity and efficiency for multi-color designs on dark textiles. |
| Real-World Scenarios and Applications | Small batches, school/team apparel, promotional items, and custom merchandise benefit from DTF on dark fabrics due to opacity and durability. |
Summary
table