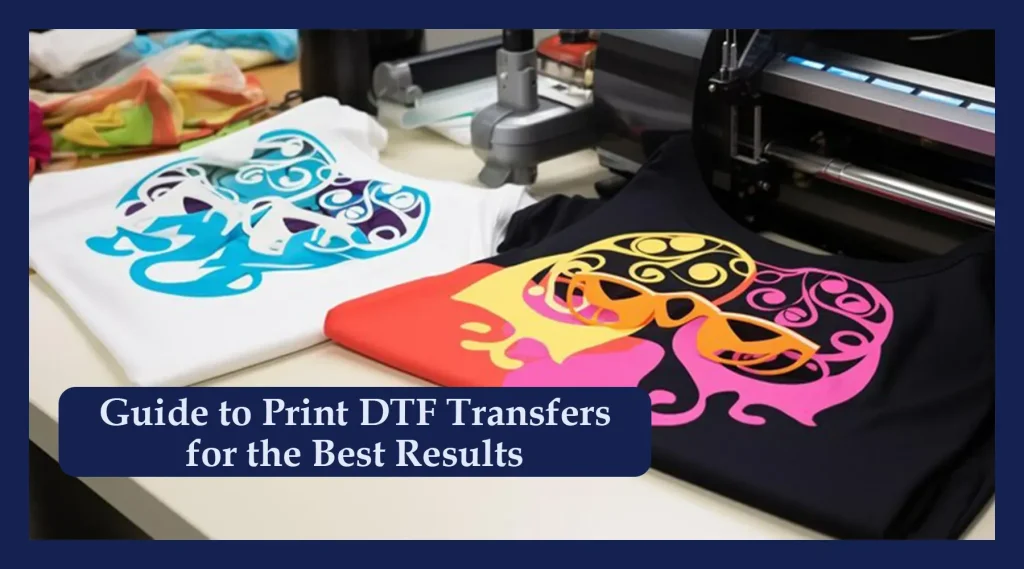
This guide on direct-to-film printing opens with how to apply DTF transfers to garments, including practical examples, beginner workflows, and setup tips. DTF transfer process blends inkjet-like color with a film substrate to create durable, flexible designs that hold up under washing, stretching, and routine wear. In the DTF printing guide, designers learn color management, white underbase considerations, print fidelity across fabrics, and how to choose the right powders. When comparing DTF vs DTG, the guide highlights differences in texture, color density, maintenance, heat-press requirements, and cost per piece for small to mid runs. This resource supports newcomers and pros alike as they plan, test, and scale direct-to-film printing projects across T-shirts, hoodies, bags, and more.
A film-based transfer method for apparel—often described as a film-to-fabric graphics technique—uses a printed sheet bonded to fabric with heat and pressure. This terminology mirrors LSI principles by linking ideas such as textile printing, heat-transfer graphics, and substrate compatibility. Think of it as heat-pressed graphics applied from a specialty film, offering vivid color, durability, and versatility across fabrics. Understanding these alternative terms helps designers and print shops optimize content for related searches while keeping the core process clear.
DTF vs DTG and Direct-to-Film Printing: Choosing the Right Path for Your Apparel
Direct-to-film printing (DTF) and direct-to-garment (DTG) offer different trade-offs for apparel producers. DTF transfers use a treated film that is printed with color inks, then coated with a hot-melt powder and heat-pressed onto fabric. This approach often delivers durable color on a broader range of fabrics, including blends and darks, with reliable white underbase and strong washfastness. For many shops, the DTF printing guide references point to flexible workflows and scalable setups for mid-volume runs.
When deciding between DTF and DTG, you weigh fabric mix, run size, and workflow. DTF can be more cost-efficient for mid-volume runs and often requires less pretreatment, while DTG excels on light fabrics with a soft hand-feel but may demand more maintenance. Use the DTF printing guide mindset to compare material compatibility, finishing steps, and long-term care to match your shop’s capabilities and customer expectations.
The DTF Transfer Process: From Design to Finished Garment
The DTF transfer process begins with design and color management to ensure artwork translates well from screen to film to fabric. Prepare artwork at high resolution (typically 300 dpi), visualize with mockups, and manage colors in the printer’s CMYK gamut to account for the white underbase required on dark fabrics. This planning step reduces surprises during production and supports consistent results.
Next comes printing onto the film, powder coating and curing, pre-press, heat pressing the transfer, and post-press curing. Each stage has recommended settings based on your materials, and sticking to the DTF transfer process helps you reproduce sharp detail, smooth color transitions, and durable adhesion across garments.
Color Management and White Underbase in Direct-to-Film Printing
Color management in direct-to-film printing hinges on predicting how colors will look after the transfer. Implementing a solid RIP workflow and calibrated profiles helps align on-screen colors with the final result. On dark fabrics, planning a white underbase is crucial, so colors stay bright and accurate after the transfer.
Consider fabric behavior and run tests to tune underbase amount, gradient softness, and edge clarity. Document these results and refine your settings, a practice you’ll find in any thorough DTF printing guide to maintain consistency across batches and fabrics.
How to Apply DTF Transfers: Best Practices for Consistent Results
How to apply DTF transfers: this section covers practical steps to achieve consistent results. Pre-press to remove moisture and wrinkles, then run the transfer at about 300–320°F (149–160°C) for 12–20 seconds with medium pressure. This is a good baseline for many film/powder combos, but always verify your supplier’s guidelines. This is a practical guide on how to apply DTF transfers correctly.
Choose the correct peel strategy (hot or cold) based on your film and powder, and allow the garment to cure properly before washing. Following these steps aligns with the DTF transfer process and helps you deliver vibrant, durable results that withstand repeated laundering.
Troubleshooting and Maintenance for Long-Lasting DTF Results
Troubleshooting and maintenance are essential to a reliable DTF workflow. Common issues include cracking, edge peeling, ghosting, or color fading, often tied to curing times, film quality, or print resolution. Systematically review each step—from artwork prep to final cure—to identify where performance diverges from expectations.
Maintain your equipment and document processes to sustain quality over time. Regular printer and heater maintenance, accurate temperature verification, and a simple change-log help keep results consistent across operators. Consider sustainable options such as eco-friendly inks or powders and strive to minimize waste, a practice highlighted in comprehensive DTF printing guides.
Frequently Asked Questions
DTF transfers vs DTG: how do they differ and when should you choose DTF transfers?
DTF transfers involve printing a design onto a special film using direct-to-film printing, then applying a powder adhesive, curing, and transferring the image to fabric with heat. Compared with DTG, which prints directly on fabric and often requires pretreatment, DTF transfers offer better durability on blends and dark fabrics and can be more cost-efficient for small-to-moderate runs. If you need vibrant artwork on a variety of fabrics with flexible application, DTF transfers are a strong choice.
What is the DTF transfer process from design to finished garment?
The DTF transfer process typically follows these steps: design and color management, printing onto the film, powder coating and curing, pre-press of the garment, heat-press transfer, and post-press curing and care. Each step should follow manufacturer guidelines to ensure accurate colors, strong adhesion, and durability across fabrics.
How to apply DTF transfers: a step-by-step guide for beginners
To apply DTF transfers, start with a careful pre-press to remove moisture, then place the printed film on the garment with the design facing up and press at the recommended temperature, time, and pressure. After transferring, peel according to film guidelines (hot or cold) and allow the design to cure before washing. Always run a test on scrap fabric to verify color, adhesion, and alignment.
What should I look for in a DTF printing guide to ensure best results?
In a DTF printing guide, focus on color management, film and powder compatibility, curing temperatures, and care instructions. Emphasize high-resolution artwork, white underbase planning for dark fabrics, and a robust workflow from design to transfer to achieve consistent, professional results.
Which fabrics are best for DTF transfers and how to maximize durability after washing?
DTF transfers work well on cotton and cotton blends, with synthetics sometimes requiring adjustments in heat and pressure. To maximize durability, ensure proper curing, follow care instructions (gentle washing, air-drying or low-heat drying), and allow a full cure time before washing. Always test new fabrics with a small sample to verify adhesion and color fidelity.
| Section | Key Point | Notes |
|---|---|---|
| Introduction to DTF transfers | DTF transfers enable vibrant, durable designs via direct-to-film printing. | Broad fabric compatibility; guides from concept to finished garment such as shirts, hoodies, bags, and more. |
| What are DTF transfers and why they matter | DTF prints a design onto a SPECIAL film with adhesive powder, cures it, and transfers the design to fabric. | Delivers vivid color, good washfastness, and supports detailed artwork across cotton, blends, and some synthetics; useful for comparison with DTG. |
| DTF transfers vs DTG | DTF uses a film substrate and powder; DTG prints directly onto fabric. | DTF offers durability on blends/dark fabrics and favorable cost-per-unit for small-to-medium runs; DTG can offer soft hand-feel and bright whites but may require pretreatment and be more fabric-sensitive. |
| Step 1: Design and color management | High-resolution artwork (300 dpi+), clean edges, mockups, and color management to CMYK. | Account for white underbase on dark fabrics and anticipate heat-press effects to preserve colors. |
| Step 2: Printing onto the film | Load film correctly and use inks compatible with DTF; verify color profile. | Aim for crisp, saturated prints with solid areas and smooth gradients. |
| Step 3: Powder coating and curing | Apply hot-melt adhesive powder and cure to fuse powder to the film. | Powder layer is essential for strong transfer bonding during heat pressing. |
| Step 4: Pre-press and transfer prep | Pre-press garment to remove moisture and wrinkles. | A brief warm-up with low pressure helps adhesion during transfer. |
| Step 5: The heat press transfer | Place printed film on garment and apply heat and pressure at target settings. | Follow film-specific guidelines and choose hot or cold peel strategy as recommended. |
| Step 6: Post-press curing and care | Allow the transfer to cure fully before washing. | Adhere to care guidelines to maximize durability (cool/warm wash, gentle cycle, air-dry or low-heat tumble). |
| Materials and equipment | DTF printer/inks, DTF film, hot-melt powder, heat press or curing station, liners, RIP software. | Ensure compatibility among printer, film, and powder to maintain consistent results. |
| Design considerations | Solid color blocks and gradients; plan white underbase for dark fabrics; maintain resolution and vector fidelity. | Design with awareness of halation, margins, and seams to prevent distortion. |
| Best practices for applying | Pre-press accurately, use approved settings, decide peel type, maintain even pressure, and cure properly. | Run test prints on scrap fabric when changing fabrics, powders, or films to optimize results. |
| Troubleshooting | Common issues include cracking, underbase imbalance, fading, ghosting, and film defects. | Adjust curing times, temperatures, and alignment; inspect films and ensure consistent pressure. |
| Durability and efficiency | Document processes, perform routine maintenance, implement QC, and optimize garment prep. | Standardize steps to improve consistency, reduce waste, and sustain quality at scale. |
| Use cases | Small-batch apparel, event merchandise, and customized orders. | DTF transfers enable quick prototyping and flexible inventory management. |
| Costs and planning | Account for film, powder, ink, energy, and labor costs; setup vs unit costs varies with volume. | Map steps, identify bottlenecks, and test across fabrics to balance cost, speed, and quality. |
Summary
DTF transfers offer a vibrant, durable pathway to custom apparel through film-based printing. By following a structured transfer process and applying best practices for design, pressing, and care, you can achieve consistently excellent results. This overview contrasts DTF transfers with DTG and presents practical tips to apply the method confidently. Whether creating small runs or scaling to larger orders, embracing DTF transfers expands capabilities and helps deliver standout garments customers love.